2019
how to make your own logo lapel pins
Most people assume that making your own enamel pins is a long and complicated process. It’s not. It’s actually pretty simple and straightforward, and in most cases, it doesn’t take longer than 2-4 weeks.In case you don't like reading articles, you can find the video version here. In case you do, here it is... :)
Okay, so you’ve got an awesome idea for a pin that you want to make.
Now what?
Most people assume that making your own enamel pins is a long and complicated process. It’s not. It’s actually pretty simple and straightforward, and in most cases, it doesn’t take longer than 2-4 weeks.
So, how do you make your own enamel pins?
The process of making your own pins can be broken down into these six steps.
PREPARE YOUR ARTWORK FILE
In order to start production, the minimum requirement a pin factory will ask for is a PDF file of the design you’d like to get produced. You can read an in-depth how-to of the design process here.
You can either draw and color a sketch of your idea on a white piece of paper and scan it as a PDF file or, if you know your way around one of the many graphic design software options out there, you can send them a digital file of the art you’d like to get made into a pin.
A few design-related tips I’d recommend for anyone starting off would be:
Simplify
Clocking in at around 1-2 inches in size, pins are a small canvas to work on so the fewer lines and details you can use to convey an image, the more likely it is that it’ll translate to a clean and clear pin design.
Use Bold Lines And Strong Colors
Pins are small so thin lines and muted colors tend to not stand out when looking at a pin from a distance. Use bold lines and strong colors instead!
Avoid Shading
Colors within a pin are exclusively delimited by the lines, this means that any type of shading within a color is not possible. Save yourself and the factory some time by not including shading in your pin design.
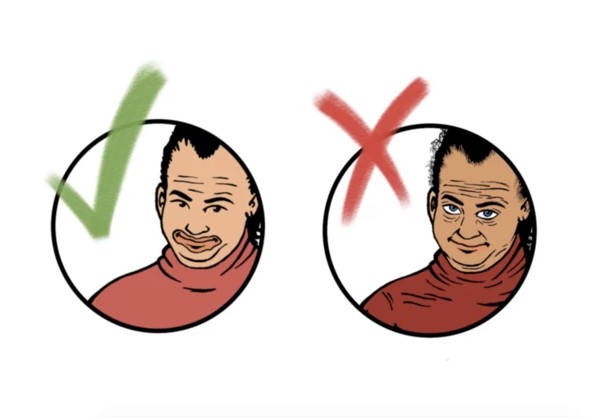
Here is an example of a pin design well suited for pin production and one that's not:
The design on the right has complex thin lines and shading. It will not translate well into a pin. The one on the left is the same design but simplified using strong bold lines that delimit all colors.
Alright, now that you have your design artwork ready, it’s time to
DECIDE WHAT MATERIAL YOUR ENAMEL PIN WILL BE
Although pins can be made from a wide variety of materials, there are two traditional formats most pin-makers stick to. Hard Enamel and Soft Enamel pins. What’s the difference?
Hard Enamel Pins
Their defining characteristic is the thin metal lines separating each color and a smooth, hard enamel finish.
They are made from die-struck iron metal and produced by heating to a high temperature and then polishing to create creating a smooth surface, which usually gives them a high-quality, durable feel.
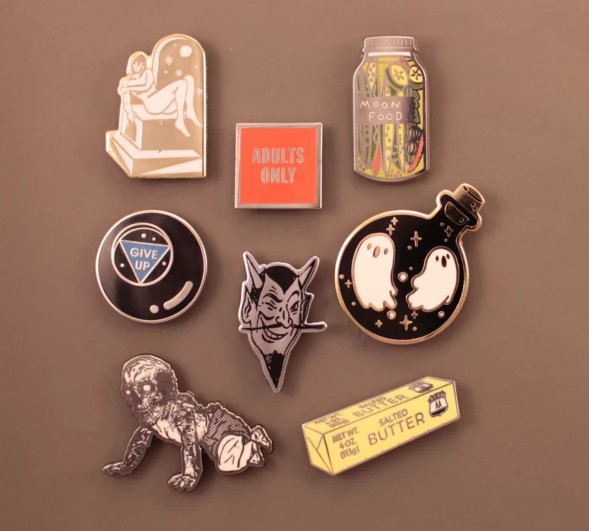
Here's an example of what a hard enamel pin looks:
Soft Enamel Pins
The defining characteristic is their textured pin surface with allowance to more detail and slightly lower cost.
They are made from die-struck iron metal, electroplated, and optional epoxy coating, which usually gives them a thinner feel in comparison to Hard Enamel pins.
They are both tried and true materials so whichever one you choose can make for a great pin. Go with whatever style can best communicate your design!
DECIDE WHAT SIZE YOU WANT YOUR ENAMEL PIN TO BE
Now that you have your artwork and pin material ready, how do you pick the size of your pins?
Smaller pins are usually between .75-1.25 inches wide or long. This makes them more portable, easier to fit onto any surface and usually lower in cost given that they use less material.
The downside to smaller pins is that they usually don’t allow for much detail when it comes to the design.
Larger pins, which are larger 1.25 inches wide or long, allow for much more detailed design since you’re working with a larger canvas, but their size also limits the places where they can be pinned too.
You’re likely not going to see many people wear a 2-inch pin on their lapel.
If you’re working with a limited budget and have a simple design, smaller pins are likely your best bet.
Pin price is usually determined by pin size, so they are likely to be cheaper. If you want to create a very detailed pin and don’t mind paying a higher price, then larger pins are the right option for you.
DECIDE HOW MANY ENAMEL PINS YOU WANT TO PRODUCE
After your artwork, material and pin size are decided upon. It’s time to choose how many pins you want to produce, and this one is pretty easy.
All factories have a minimum of 100 units for your first order. I’d always recommend sticking to the minimum of 100 pins and then re-ordering more if it does well.
Most of the time, it’s very hard to predict how well your pin will be received and it’s always best to play it safe than order large quantities of a pin no one is buying.
DECIDE HOW MANY PIN-BACKS YOU WANT YOUR ENAMEL PIN TO HAVE
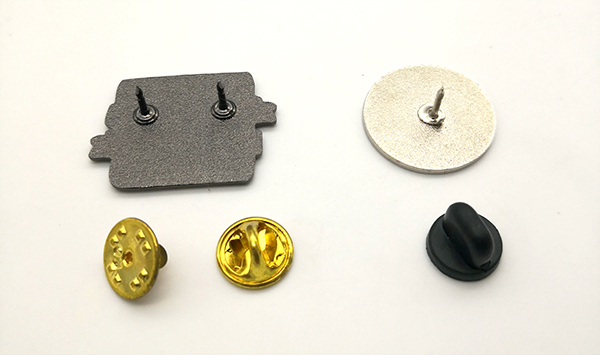
A pin-back is the needle-like mechanism, usually in the rear section of a pin, that is used to temporarily fasten it to a surface.
And when it comes to pin-backs, there’s only one thing you need to know:
Always put two pin-backs on all of your pins!
Why? Using only one pin-back will allow your pin to jiggle around wherever you place it and it’ll be a lot more likely to fall off and get lost.
There’s nothing worse than losing a loved pin due to faulty pin-back planning.
Don’t make the mistake I, and countless of other first-time pin makers have made...always put two pin-backs on your pins.
FIND A FACTORY TO PRODUCE YOUR ENAMEL PINS
Last but not least, it’s time to find the right factory to produce your pins. You can find a list of my favorite manufacturers (and their contact information) here. You can also find a video explaining this process here.
A quick Google or Alibaba search for “enamel pin factory” will bring up dozens of suitable producers.
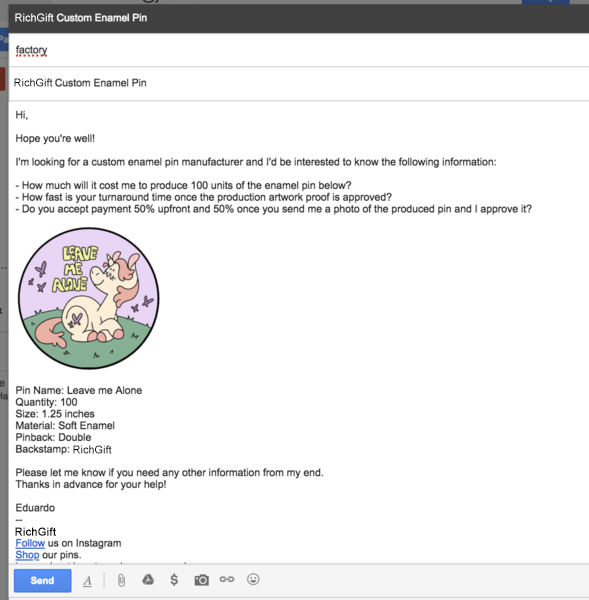
To decide who to work with, email them a low-res jpg of your artwork (not the final PDF, which will help avoid them “borrowing” your design), the material you’d like, the size, the quantity, the number of pinbacks you’d like and ask them the following questions:
- What will it cost me to produce 100 units of this enamel pin?
- What's your turnaround time once the artwork is approved?
- Can you send me a photo of the produced pin before you ship it out?
- Do you accept payment 50% upfront and 50% once the photo of the produced pin is approved?
Note: these are favorable payment terms for you because they allow you to view the enamel pin before it's shipped out and ask for revisions if the factory produced the pin differently than the artwork you approved.
This is what your email should look like:
The factory that gives you the best terms for these 4 questions is the one you should go with.
In most cases, the production and communication process will go something like this:
→ You send them your artwork with all of your requirements for production.
← They give you a cost estimate and final production artwork for your approval.
→ Once artwork and costs are approved by you, you pay them 50% of the total costs to start production.
← They produce the pin for you in the turnaround time they committed to.
← Once the pins are produced, they’ll send you a photo of the final product for your approval.
→ If you’re happy with the quality of the final product in the photo, you approve it for shipment and you pay them the final 50% of the total costs.
← They’ll give you a tracking number for your shipment and you’ll receive your pin.
Ta-da! And you're all set! Now you have all the essential information you need to make your first pin :)
